Bare_libvirtd
Create virtual machines using just virsh on a linux KVM/QEMU hypervisor.
Cheat sheet
Check info about the qcow2 image that you’re looking at:
qemu-img info </path/to/file>
Overlay a base qcow2 image:
qemu-img create -f qcow2 -b </path/to/base/image> -F qcow2 </path/to/new/image>
Overlay a base qcow2 image with specific virtual size:
qemu-img create -f qcow2 -b </path/to/base/image> -F qcow2 </path/to/new/image> G
Shows your active libvirt networks:
virsh net-list
Duplicate a network’s xml definition:
virsh net-dumpxml <network>
Start a libvirt network:
virsh start <network>
Start a libvirt network whenever libvirtd comes up:
virsh autostart <network>
Shows mac addresses and dhcp leases on a network:
virsh net-dhcp-leases <network>
Power off the machine from the cable:
virsh destroy <machine>
Power off the machine from the OS:
virsh shutdown <machine>
Remove the machine from libvirt:
virsh undefine <machine>
Attach a physical (except that it’s virtual) console to a running machine:
virsh console <machine>
Start a machine whenever libvirtd comes up:
virsh autostart <machine>
Prevent a machine from starting whenever libvirtd comes up:
virsh autostart –disable <machine>
Actual article
There are many ways to approach virtualization, depending on your needs — whether personal or enterprise-level. In this article, I’ll focus on personal use, e.g. running VMs on a laptop.
Then depending on the platform that you’re on you have different options.
I will not even quote all of them because I do not know them or have used them.
I think I only used virtualbox a couple of times on a windows machine many years ago.
The platform that we’re focusing on is a Linux based workstation, in my case is a Fedora-based, but could be any I suppose.
Each platform has its own way of managing VMs, but with libvirt on QEMU/KVM you can handle everything from the shell without relying on GUIs, keeping yourself closer to the implementation, maybe learning a couple of things here and there.
libvirtd
libvirt is the name of a library used under Linux to control the QEMU/KVM stack and bring a user interface to the table. The same name also refers to a daemon that is constantly running on your system that takes care of the management of all the components: libvirtd.
You can access the running daemon from a graphical user interface or from the command line with a tool called virsh, in a similar fashion as the way you use docker to interact with the dockerd daemon that manages your containerized workloads.
Now libvirt kinda expects your virtual machine disks to be under a certain path on your system: “/var/lib/libvirt/images”. And I say kinda because the disks or ISO files can be wherever you want really. You can also create directories under /var/lib/libvirt/images/ to keep things tidy.
And tidiness is the difference between a sysadmin and a great sysadmin, a piece of software and a great piece of software,.. a working setup and a maintainable setup.
A tidy setup example
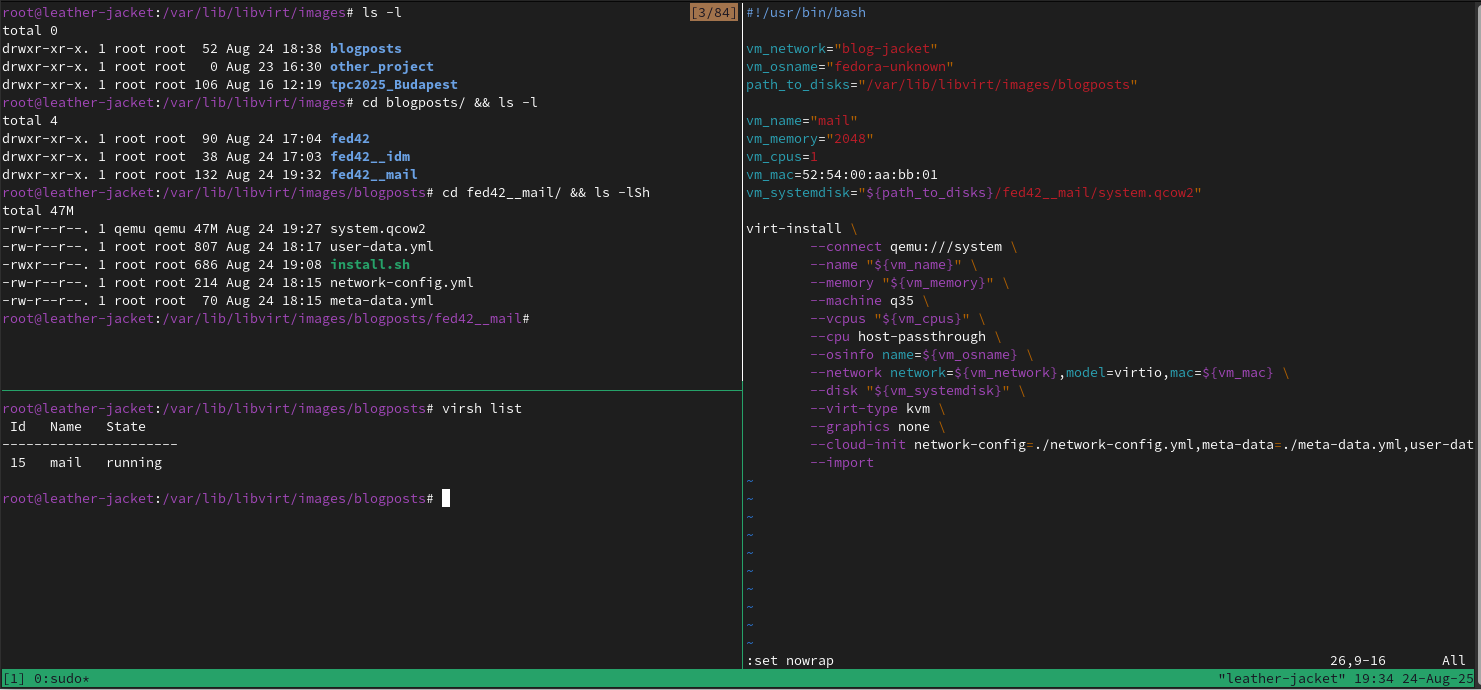
After several settings I find myself at ease with a setup similar to the following:

Now each pane in this window shows something about the setup, so let’s take it step by step.
-
libvirtd’s image filesystem
Here instead of putting everything under the disks filesystem, we’re organizing by projects or any other meaningful distinction.

-
Inside each folder
Here you should find one (could be more) directory that contain just a base qcow2 image that should not be written (i.e. fed42 in the screenshot below). This serves the purpose of being a base for an overlay file that is the end virtual machine’s actual disk image.
Then more directories each containing files needed to generate the end virtual machine.
In regard of the names, I chose to prefix a label that represents the disk on which the vm is based.

Now overlay means that given some virtual machines with the same operating system version, instead of having a full disk for each, we can have a shared base, and each virtual machine’s disk will be a file that references the content of the base disk, and directly contains only the differences from that base.
In regard of the names of the folder representing virtual machines, I chose to append a prefix that references the base qcow2 disk. -
vm folder
Inside fed42__idm we have some files

- system.qcow2 - is the overlay file based on fed42’s disk
systemd.qcow2, as opposed to app.qcow2 or app1.qcow2/app2.qcow2 and so on…
Those in order to indicate a separation between the operating system disk, and eventually one or more disks needed by an application that runs on the OS.
Notice how this file weights just a couple hundreds of KB after creation. - install.sh - is a tiny parameterized script with just a command line
- user-data - is a yaml containing params to pass to a svc inside the vm at boot
- system.qcow2 - is the overlay file based on fed42’s disk
-
the install file
Very minimal, just a command line.
Why? Because you shouldn’t rely just on your memory for the command line that spawns that particular virtual machine, nor your bash’s (or any) memory, because it is limited, which means that if for a week you work on something else, you need to rebuild everything.
I found this especially useful, because if you maintain this install.sh file, you can destroy/undefine the virtual machine and recreate it fresh in no time. Useful as a scratch space.

-
user-data
These are small yaml files. Same format style used by Ansible and Kübernetes.
Here we are specifying a couple of modules of cloud-init that should be invoked at boot time in our newly created virtual machine, so that we can write and version, for each virtual machine a set of configurations that we would like to find there, such as users with certain ssh keys and sudoers policies and so on…
tutorial
Now say we want a new virtual machine for our (e.g.) mail delivery and access needs.
prereq | Base image
The prerequisite is to have a Fedora Base qcow2 image or any image for a specific operating system.
We are looking specifically for a qcow2 image and not an ISO file. The ISO file is an archive containing a set of artifacts that you need to install an operating system, usually you burn that on a usb stick and install it on baremetal. While the qcow2 is the already installed operating system.
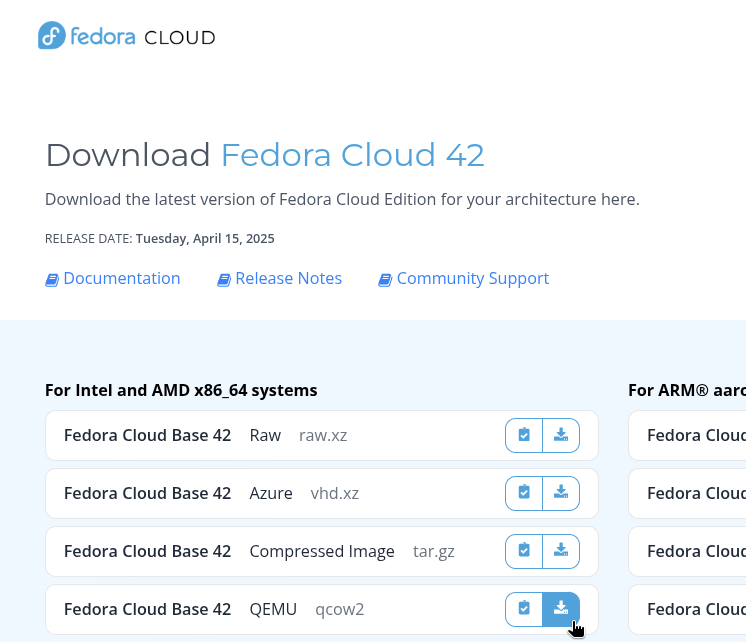
You’ll find that the various projects refer to those images as “Cloud Images” when you’ll looking at their download page. In the case of Fedora latest (as of today: Fedora 42), you’ll just have to google “fedora download” and click your way towards https://fedoraproject.org/cloud/download.
You’re looking for a Cloud Image in the QEMU (qcow2) format. Careful not to download any other type, even if qcow2 image, the “Cloud Image” is the one optimized to run in a virtualized setup that is controlled cloud-style, this means that services such as cloud-init are already baked inside the image, and also that the kernel is optimized for a virtual deploy.

prereq | libvirt network
Each libvirt setup has a network called “default”, and in order to separate your virtual machines and keep tidiness, you could have another or many other different networks for different needs.
In my case I’ll create a network called “blog-jacket”, and a possible procedure to accomplish so, looks like the following:
- Dump the xml definition of the default network:
virsh net-dumpxml default > blog-jacket.xml - Make your modifications
- Define a new libvirt network from an xml file:
virsh net-define blog-jacket.xml - Start now, and whenever you start your libvirtd instance:
virsh net-start blog-jacket
virsh net-autostart blog-jacket
I want to be in control of each virtual machine’s IP address, and this is doable in a number of ways, either with DHCP reservations based on MAC address inside the libvirt network’s definition, or by just claiming static IP addresses inside the virtual machine’s network stack.
We can do either since we are in control of both the MAC address and first boot parameters that influence the network configuration.
My blog-jacket.xml file looks like the following:
<network>
  <name>blog-jacket</name>
  <forward mode='nat'>
    <nat>
      <port start='1024' end='65535'/>
    </nat>
  </forward>
  <bridge name='virbr2' stp='on' delay='0'/>
  <ip address='192.168.126.1' netmask='255.255.255.0' />
</network>
create a new virtual machine
We’re starting from the point where you have a qcow2 disk for your operating system, placed inside your project’s path (e.g. /var/lib/libvirt/images/blogposts) under a (e.g.) fed42/ directory. The rest of the steps are the same for each virtual machine:
-
Create the folder for the virtual machine
Inside our project: /var/lib/libvirt/images/blogpostsmkdir fed42__mail cd fed42__mail -
Add a system.qcow2 disk
Our system disk is going to be an overlay file based on the image that we downloaded from the Fedora Project download page.qemu-img create -f qcow2 -b /var/lib/libvirt/images/blogposts/fed42/Fedora-Cloud-Base-Generic-42-1.1.x86_64.qcow2 -F qcow2 system.qcow2Now you can inspect the image and see that it has a disk size and a virtual size.
The former is the actual size of the newly created qcow2 file on your disk, while the latter represents a size up to which the guest operating system running on this qcow2 file can write. You can even extend this by appending a <SIZE>G parameter at the end of the previous command line.qemu-img info system.qcow2 -
Add some install.sh file
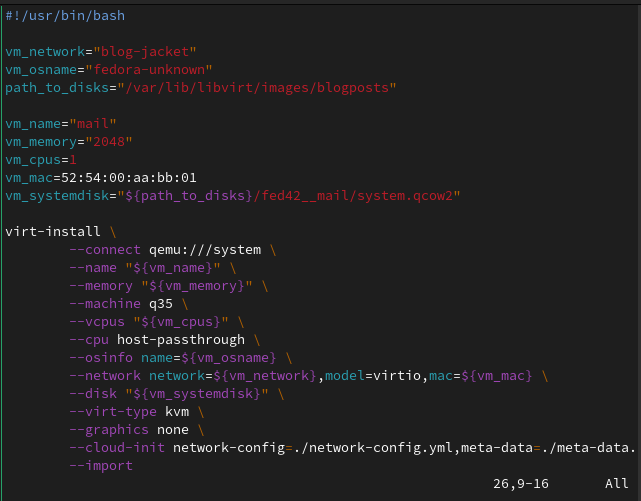
You can have a base install.sh that you copy around, they are mostly similar between different virtual machines. The content is more or less this:#!/usr/bin/bash vm_network="blog-jacket" vm_osname="fedora-unknown" path_to_disks="/var/lib/libvirt/images/blogposts" vm_name="mail" vm_memory="2048" vm_cpus=1 vm_mac=52:54:00:aa:bb:01 vm_systemdisk="${path_to_disks}/fed42__mail/system.qcow2" virt-install \ --connect qemu:///system \ --name "${vm_name}" \ --memory "${vm_memory}" \ --machine q35 \ --vcpus "${vm_cpus}" \ --cpu host-passthrough \ --osinfo name=${vm_osname} \ --network network=${vm_network},model=virtio,mac=${vm_mac} \ --disk "${vm_systemdisk}" \ --virt-type kvm \ --graphics none \ --cloud-init network-config=./network-config.yml,meta-data=./meta-data.yml,user-data=./user-data.yml \ --importHere I said vm_osname=“fedora-unknown” because I couldn’t find fedora42 in the output of
virt-install --osinfo list, a.k.a. the place that you should look for this parameter.One should take care that vm_mac is different across different virtual machines on the same network.
You can check your active virtual machines and their mac address with:virsh net-dhcp-leases blog-jacketThen you could add a parameter such as: vm_appdisk under vm_systemdisk, and add a –disk “${vm_appdisk}” as a parameter to the virt-install command.
In order to create a raw disk you could run:qemu-img create -f qcow2 app.qcow2 60G, and that would not be an overlay image.Ah yeah.. also those cloud-init files are not there yet.
-
Add the cloud-init files
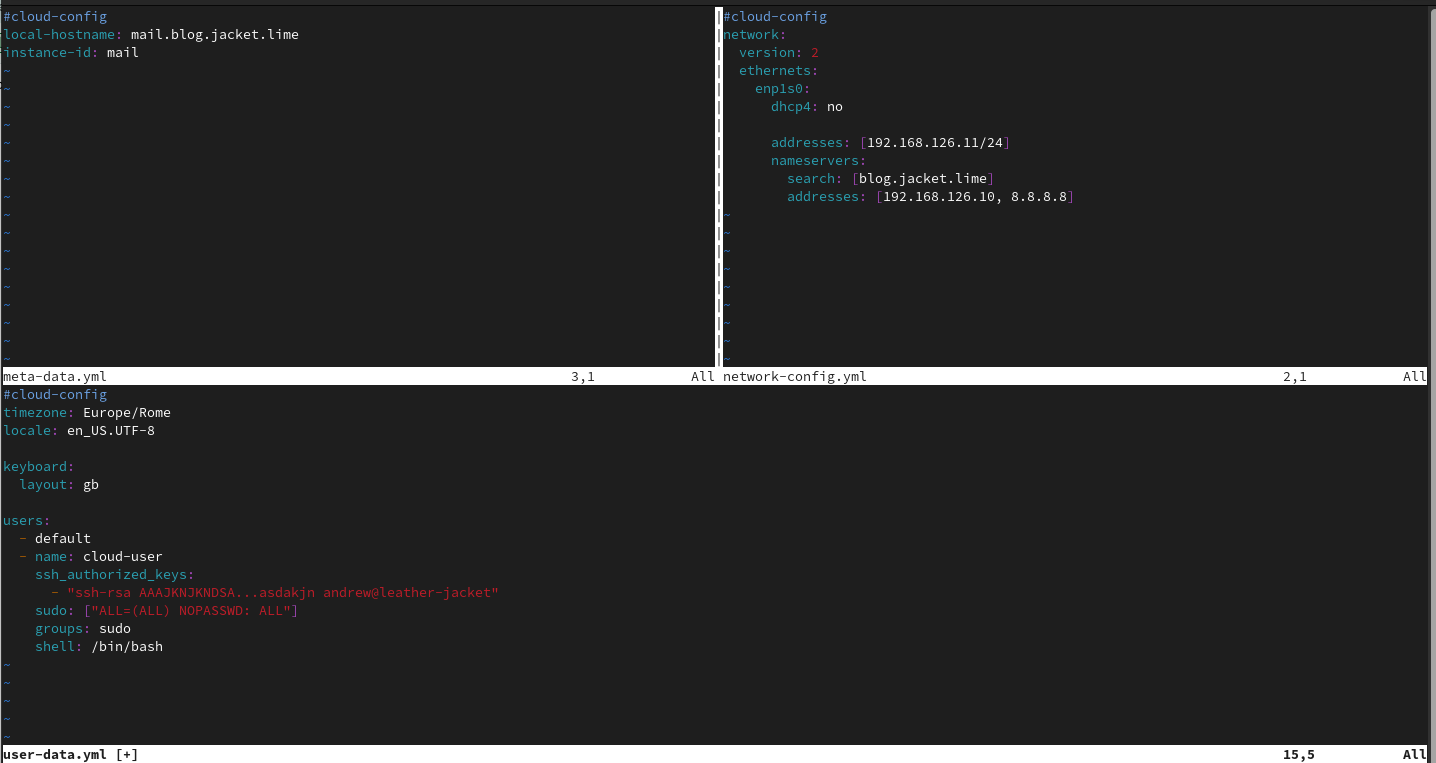
Once able to make this work with your setup, it become very easy to make and maintain changes to your virtual machine’s configuration.In the screenshots below I’m using three distinct yml files, one for meta data, one for user data, one for network configuration: namely meta-data.yml, user-data.yml and network-config.yml. Each serving a different purpose.
In my case user-data contains parameters for the cloud-init modules in order to create some users that I will use to ssh into the machines. meta-data contains the hostname of the machine and network-config will contain the minimum amount of network definitions to make this virtual machine work with the rest of the infrastructure:
The libvirt network that I’m using does not have DHCP features, so all the IPs must be statically configured inside the virtual machines. Also there is another virtual machine inside the blog-jacket network (192.168.126.0/24), that exports a dns service.
About how to write those files: there are explanations about network here and other examples here.
There are many things that could go wrong, and the cloud-init instance inside the virtual machine will fail silently. A good way to troubleshoot is to enter the virtual machine and use the following command line:
cloud-init schema --config-file user-dataWhere user-data is a file containing your (e.g.) user data, that you somehow copied in the virtual machine. Read the output carefully because if there is any error in your parameters, they will be outlined there.
Also there are /var/log/cloud-init*.log files inside the guest virtual machine.If you were not able to configure your users, you can use a trick such as:
virt-customize -a system.qcow2 --root-password password:'redhat' --run-command "echo PermitRootLogin yes >> /etc/ssh/sshd_config"In which case virt-customize will start a minimal kernel with your system.qcow2 disk and do what requested, in this case modify the root password and enable root login with password via sshd.
-
chmod the install file and fire it up
chmod 0755 ./install.sh
install.sh
Whenever you screw things up, you can tear everything down and restart in no time:
virsh destroy mail && virsh undefine mail && rm -f system.qcow2
qemu-img create -f qcow2 -b /var/lib/libvirt/images/blogposts/fed42/Fedora-Cloud-Base-Generic-42-1.1.x86_64.qcow2 -F qcow2 system.qcow2
If everything works you can choose a host from which to perform the ssh jump into the virtual machine. In my case, this will be the user account of the OS on my laptop, same OS that provides the hypervisor capabilities.
I like to manage my virtual machines via ~/.ssh/config like so:
# blog-jacket machines
Host bmail
        Hostname 192.168.126.11
        User cloud-user
        Port 22
        IdentityFile ~/.ssh/id_rsa_blog
Sometimes it will happen to you that you’ll recreate a host multiple times, and the ssh identity of it will change as it gets regenerated randomly during each creation process, and your ssh client will complain.
The line below will fix things:
ssh-keygen -R 192.168.126.11
Appendix | MAC Address meaning
The first 3 bytes are called OUI (a.k.a. Organizationally Unique Identifiers) and are IEEE assigned to vendors. The last 3 bytes are decided by the vendor itself.
In our case 52:54:00 is the OUI that represents QEMU/KVM, as reserved by IEEE.
Whenever you see a MAC address starting with 52:54:00, you can say “this NIC has been generated by QEMU/libvirt”.
The same goes for VMware, whose assigned OUI is: 00:50:56 as documented in a Broadcom article dated 2025.
Then there are others, but I am not sure if there is a public IEEE OUI reference or not, one has to rely on the vendor’s documentation.. I’ll stop here, cause I was about to write some fake news in this article on suggestion of ChatGPT.