Mail_install En
Say you have a private NATted network where you’re running a couple of services, maybe those services occasionally have the need to notify users and administrators (you could be both) about stuff that is happening (observability stack), stuff that needs your intervention (still observability and remediation stuff, automations, …), or whatever other reason that you may think of…
In this article we’re spinning up a dedicated machine that will act as the mail host for the blog.jacket.lime domain, accepting emails from hosts in this domain and delivering to mailboxes that are also accessible via the IMAP protocol. To accomplish this, we’ll deploy and configure the Postfix/Dovecot combination.
There is a brilliant introduction about all the moving pieces that bring the “mail infrastructure” to life, from the mutt project, this document talks about “the notorious MxA bunch”. Now the first time I heard about mutt it tought it was so cool, cause kernel people used it as the best email client. It is also a fact that the first time I tried to read the upper mentioned document and setup mutt, I did it, but not understand a bit of what I was doing.
In our simple scenario there’s gonna be a Mail Transfer Agent (or MTA) implemented by Postfix, and a Mail Delivery Agent (or MDA) implemented by Dovecot. The MUA or Mail User Agent, or basically your mail client can be whatever, I’ll probably stick to evolution on my laptop to get desktop notifications.
Assumptions
- A dns server managed by a freeipa installation at 192.168.126.10
- A mail.blog.jacket.lime machine at 192.168.126.11
- there is no local firewall active on the mail machine
- cloud-user on the mail machine
- GNOME DE with Evolution as an email client
- blog.jacket.lime is the domain that we are controlling
Please note also that I assume that this setup is used only inside a closed lab environment, as the cofiguration is not secure enough for any other kind of environment.
Setup the MX record
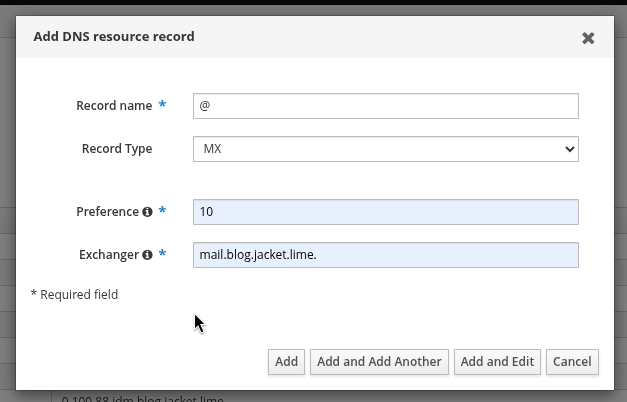
Take note of the mail machine’s ip address, and setup the A record for it, together with the MX record, that advertises it as the mail server for that domain.
The method you use could be anything from a web app such as the one of FreeIPA, or via the zone file with a text editor for a standalon named daemon, or anything in between.
First you setup the A record that points an host to an IPv4 address, and that’s easy.
The next step is to create an MX record for the whole domain, that points to the host previously defined in the A record.

To verify that the MTA for your domain is the mail host, and that the mail hostname resolves to your ip,
you can make a couple of dig requests to the specified dns server:
dig @192.168.126.10 MX blog.jacket.lime +short
dig @192.168.126.10 A mail.blog.jacket.lime +short
Components installation
dnf install postfix dovecot s-nail
the s-nail package contains the /bin/mail utilty that we’re gonna use to test the correct transmission and delivery.
And that’s it…
Postifx setup
Postfix is gonna be our MTA, will deliver emails for the blog.jacket.lime domain and submit emails to the Dovecot server via the LMTP protocol. Since both services are local, they don’t have to speak LMTP over TCP/IP, but postfix can connect to a local unix socket, known as “the lmtp socket”.
First file that we’re looking at is /etc/postfix/main.cf
WARN: whenever you see an entry, commented or not, that you wanna set, change, whatever, don’t do it!
Instead make a copy of the line and paste it just below, and edit that. You will thank me.
Below is a collection of settings that you should research in your main.cf file and change accordingly:
# /etc/postfix/main.cf

myhostname = mail.blog.jacket.lime
mydomain = blog.jacket.lime

inet_interfaces = $myhostname
inet_protocols = ipv4

# Here the $mydomain at the end is important
# it is this that makes this postfix the "final destionation" for the mails in this domain
mydestination = $myhostname, localhost.$mydomain, localhost, $mydomain

# These are voluntarily left blank, as we are never relaying
relay_domains =
relayhost =

# We're accepting only from localhost and 192.168.126.0/24
mynetworks = 192.168.126.0/24, 127.0.0.0/8

# Remember that if using lmtp home_mailbox and mail_spool_directory
# should be left unset on the postfix side as Dovecot will take care of that
mailbox_transport = lmtp:unix:/run/dovecot/lmtp
To check the sanity of your postfix config file:
postconf -n
If it exits successfully echo $?, it means the config is at least syntactically correct.
Dovecot setup
On the Dovecot side we’re setting up which users have a mailbox, where that mailbox is and so on…
We’re setting up something very simple:
- users are system users - the ones in /etc/passwd
- authentication is done via system password - the one in /etc/shadow
- the maildir location is ~/Maildir in each user’s home directory
The defaults in dovecot are already good enough.
Here we’re removing the submission and pop protocol, leaving only imap which enables us to access our mails from a mail client, and lmtp which enables postfix to transfer mails to dovecot to handle the delivery to the mailboxes.
# /etc/dovecot/dovecot.conf

protocols = imap lmtp
Sets the location and format of the mailboxes, to a maildir in the ~/Maildir directory of each user’s home directory.
# /etc/dovecot/conf.d/10-mail.conf

mail_location = maildir:~/Maildir
This is needed in order for Dovecot to correctly authenticate system users.
# /etc/dovecot/conf.d/10-auth.conf

auth_username_format = %n
You can check if Dovecot recognizes a user with the following:
doveadm user cloud-user
If you’re getting any unrecognized user or no such user error, this is how to troubleshoot it.
Control services
Both Postfix and Dovecot support the configuration reload feature.
Whenever you change something, in order to see it in action:
sudo systemctl reload postfix
sudo systemctl reload dovecot
MUA setup - Evolution on GNOME
Edit > Accounts
Add > Mail Account
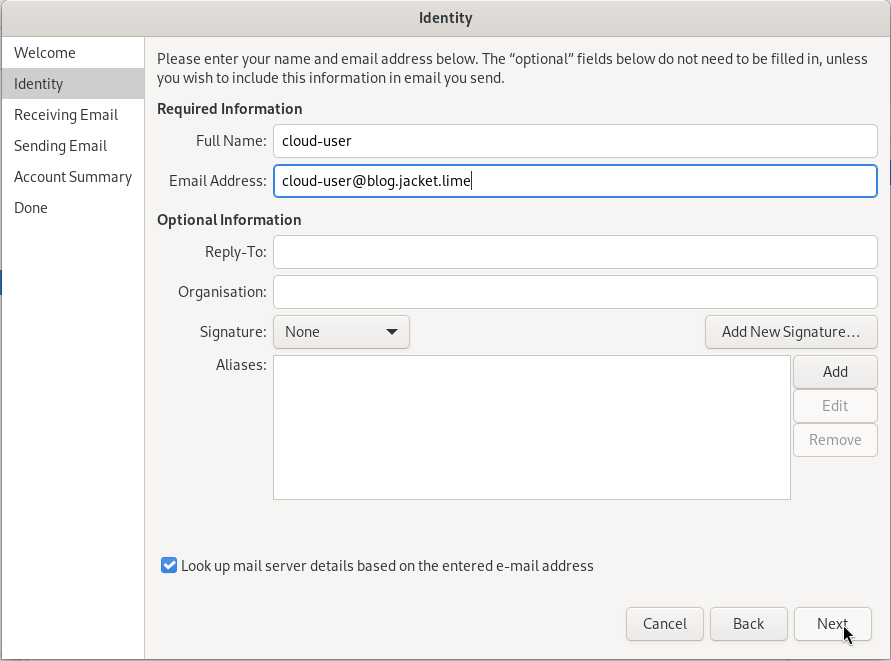
For the identity form, you only need the email address of the cloud-user.

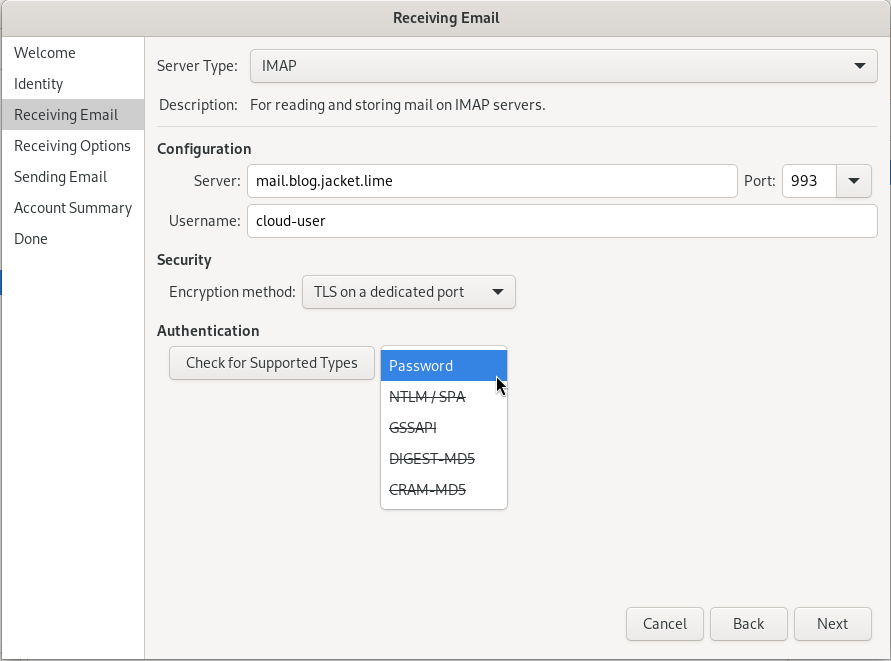
The “Receiving Emails” form wants to know the dovecot host:port couple: in our case mail.blog.jacket.lime:993
The username is cloud-user, as per /etc/passwd.
For the authentication, you can help yourself with the button “Check for supported Types”, and in our case there should be just “Password”.

In the “Receiving Options” I prefer setting a reasonable amount of minutes after which to have Evolution check for new emails, which is literally the first option of the bunch.
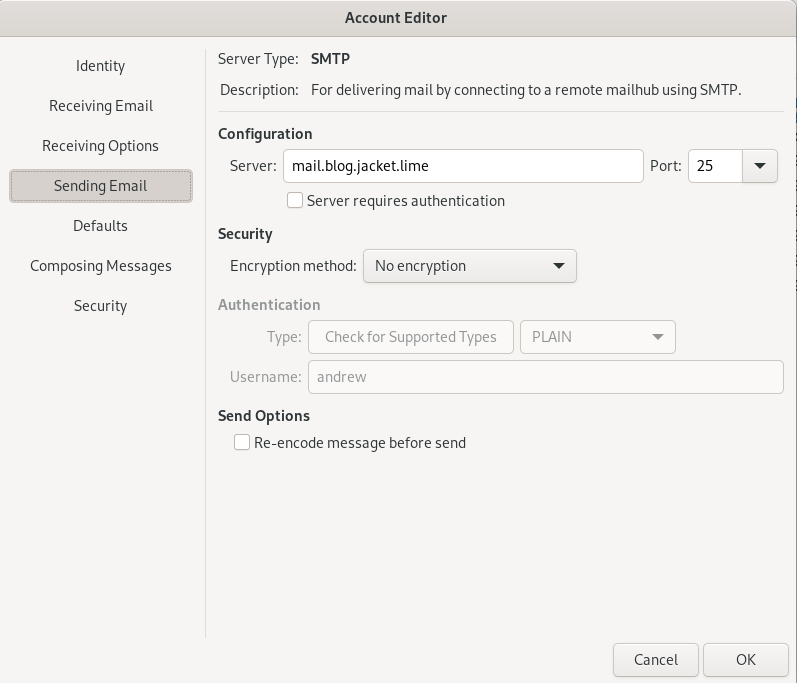
The “Sending Email” form wants to know the hostname/port for the Postfix service,
in our case it will be mail.blog.jacket.lime:25 without any encryption.
It is worth mentioning that port 25 is the port for MTA-to-MTA transmission, and not our MUA-to-MTA, which
should be one of 587 or 465, that would require extra configuration and hence it was avoided.
Just remember it is not a best practice.
Another thing worth mentioning, is that the mail submission works automatically and without authentication,
just because the host where the Evolution client is, is part of the network listed in Postfix’s mynetworks
parameter, that enables clients to submit or relay mails without authentication.
Everything outside mynetworks would need SASL authentication.

Then some other trivial options and that should be it.
At any point Evolution will prompt you about the certificates exposed by the Postfix and Dovecot services, which have been left self signed, and you can then choose to trust them temporarily.
To test everything you could:
echo “This is a test mail” | mail -s “testmail” cloud-user@blog.jacket.lime
If it works you’ll see it in Evolution as a popup on your gnome.
If you don’t see it:
sudo journalctl -e